A bad clutch master cylinder can lead to a soft pedal, shifting problems, and fluid leaks. If you run an auto repair business or enjoy DIY car maintenance, knowing how to replace a clutch master cylinder is a valuable skill that saves time, reduces repair costs, and ensures smooth vehicle operation. This step-by-step guide will help you properly replace, bleed, and test a new clutch master cylinder.
How to Locate and Diagnose a Bad Clutch Master Cylinder
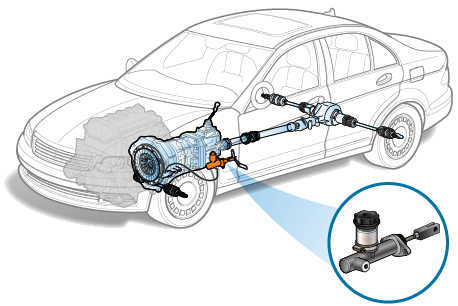
Where to Find It?
- Most cars: Mounted on the firewall near the brake master cylinder (e.g., Toyota Corolla).
- Truck: It may be under the cab, in the engine compartment, in the chassis area, or behind the pedals (e.g., Chevy Silverado).
Signs of Failure
- Soft or sinking clutch pedal → Internal seals leaking.
- Hard shifting or stuck gears → Fluid pressure loss.
- Hydraulic fluid stains under the dashboard or firewall.
How to Replace a Clutch Master Cylinder

Step 1: Gather Tools & Prepare
What You’ll Need:
- New clutch master cylinder (OEM or high-quality aftermarket)
- Brake fluid (DOT 3 or DOT 4)
- Wrenches (10mm, 12mm, 14mm, depending on your vehicle)
- Bleeder kit or vacuum pump
- Plastic tubing & catch bottle (for bleeding process)
- Gloves, rags & safety glasses
Preparation & Safety Tips
- Park the vehicle on a level surface and engage the parking brake.
- To prevent accidental short-circuiting, disconnect the power supply.
- If you want to make maintenance easier, you can use jacks
Pro Tip: Take pictures before removing parts to help with reassembly.
Step 2: Remove the Old Clutch Master Cylinder
- Locate the master cylinder.
- Drain the clutch fluid from the system using a syringe or turkey baster.
- Disconnect the hydraulic line from the master cylinder using a wrench.
- Remove the bolts securing the master cylinder
- Locate the push rod connection to the clutch pedal inside the cabin. Remove the retaining clip and slide the push rod off the pedal.
- Carefully pull out the old clutch master cylinder from the firewall.
Tip: Have a rag handy to catch any leaking fluid.
Step 3: Install the New Clutch Master Cylinder
- Position the new master cylinder, aligning it with the firewall mounting holes.
- Reconnect the push rod to the clutch pedal inside the cabin. Secure it with the retaining clip.
- Install and tighten the mounting bolts to secure the master cylinder to the firewall.
- You’ll want to reconnect the hydraulic lines and make sure the lines are properly tightened to prevent leaks.
- Double-check all connections before proceeding.
Tip: If your car has a pre-filled master/slave unit (standard in Ford & GM), follow manufacturer-specific bleeding instructions.
Step 4: Bleed the Clutch System
Bleeding removes air bubbles from the hydraulic system, ensuring proper clutch function.
How to Bleed the Clutch System (Manual Method)
- Fill the clutch master cylinder reservoir with fresh DOT 3 or DOT 4 brake fluid.
- Have a helper press and hold the clutch pedal while you open the bleeder valve on the clutch slave cylinder.
- Let air and old fluid escape, then close the valve before your helper releases the pedal.
- Repeat this process (pump-hold-release) until you see only clean fluid with no air bubbles.
- Fill the brake fluid reservoir and make sure the clutch pedal is firm.
Alternative: If working alone, use a vacuum pump to pull air from the bleeder valve.
Step 5: Test the Clutch System
- Inspect all connections for leaks (look for wet spots near fittings).
- Press the clutch pedal multiple times – it should feel firm and responsive.
- Start the engine and test shifting gears – it should engage smoothly.
- You need to make sure the car is running properly by taking it for a test drive.
If the clutch still feels soft, repeat the bleeding process.
Considerations for Different Models and Brands

Mechanical vs. Electronic Clutch Systems
- Electronic clutches (e.g., Volkswagen DSG) require disabling sensors via ODIS software before replacement.
- Mechanical systems need push rod length verification (must match original, ≤1mm tolerance).
Compact Cars vs. Trucks
- Trucks (e.g., Ford F-150) require removing the pedal assembly and then using a universal joint wrench in tight spaces.
- Sports cars (e.g., Porsche 911) require removing firewall insulation for access.
Brand-Specific Installation Notes
- Ford & GM: Some models require replacing the entire pre-filled master/slave assembly instead of just the master cylinder.
- Volkswagen & Audi: The clutch master cylinder shares fluid with the brake reservoir – requires pressure bleeding.
- Nissan & Toyota: These are Standard replacements, but some Nissan models require additional bleeding steps.
Always check your vehicle’s service manual before starting!